Tuesday, January 26, 2010

Bee Mine Tea Holder

I saw this cute tea bag holder on Lollychops blog and thought it might be fun to make these with my daughter. I found this stamp in the $ section at Michael's and thought it would be easy for my daughter to color for her valentines for her kindergarten class.

Lollychops version had a lot more detail, but I wanted to keep it simple so we could repeat it 25 times.

You can find the pattern and directions over at Lollychops

Saturday, January 23, 2010

Blast Off

I recently purchased this awesome Space/Rocket stamp set at Michael's and I think it's by Recollections. The paper is some co-ordinating stuff that they have out right now too.
I stamped some of the stars on the envelope to add a little more fun to it all.
I frayed the edges of the burgundy and the cream colored papers by using my X-Acto knife on the edges.
I stamped the Happy Birthday(I think they are K.I. clear stamps) and then colored it in with colored pencils. I stamped some random stars around on the card for balance and colored them also.
I stamped the rocket and then colored it with colored pencils and added Diamond Glaze to the window and the very tip to make them shine.
Here is the weekend sketch challenge that I based my card upon. It is a pretty literal version of the layout, but I think it will work good for a fun boys birthday card.

Wednesday, January 20, 2010

Valentine's Heart Craft

Here is an easy & fun craft to do with kids. I found the directions on Martha Stewart's website.
Start with a sheet of waxed paper folded in half the long way and put crayon shavings in the middle of it. We found out after the next step that this was not enough shavings. It works better with thicker shavings and in multiple shades. But be careful not to make too many shavings or they will ooze out the sides.
Then I cut a paper bag in half and put one half under the wax paper and the other on top of it and then ironed on top to melt the crayons underneath of it. They melt pretty quickly so check it often.
This is how one of ours turned out. Then the kids traced hearts on the wax paper and cut them out.

We are going to take down the snowflakes that we made and hang up the new hearts in the window instead. My nephew wants to cover his whole bedroom door with them!

Close up pic.

Saturday, January 16, 2010

Part Way Done

Here is the project that I started and still need to "save".
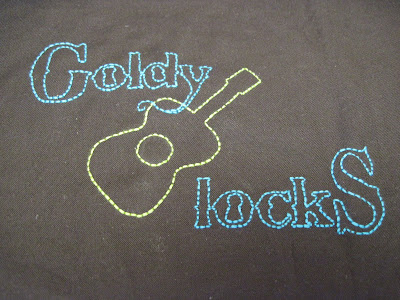
Here is the part that I embroidered for my buddy GoldyLocks. I traced the guitar off of the fabric in a funky matching green color and then I traced her logo font around the guitar and embroidered that.
I could really use a light box, because I held this brown fabric up to my lamp shade and tried to trace it that way...
I want to make this into a pillow with the guitar fabric on the sides, but I cut it a little too small trying to master the Rotary Cutter/Ruler thing. I will try to find some other fabric that matches and make it work. I just hope it doesn't look too county, as she is a total rock chick!

Thursday, January 14, 2010

New Phone Holder

I'm not even sure how I came across this tutorial, but when I saw it, I just knew I had to make it.
My husband went out to get me a new phone the other day & it's one of those really nice touch screen phones. I have to say that I really do enjoy having a phone that works, plus has talking GPS, Internet, email, Pandora, Facebook etc... Then he(and other family members) decided that I really needed a Bluetooth for talking and driving. Only now I needed a place to put them both together in one place so that I didn't misplace that crazy small earpiece.
Then I found this tutorial and directions for making a phone/camera holder & decided I needed to make it! I found it over at Sew Mama Sew's website: Sew Mama Sew Tutorial
It is really quite simple and you can even use scraps! The fabric I used(by Alexander Henry) was leftover from the other project I am still working on. I even improvised because I didn't have any batting to use for the lining but I did have a scrap of fleece I found in my "Pile of Scraps That I Will Use One Day".

The photo is turned for some reason but you get the idea. I just sewed along the edge of the fleece instead of trimming it afterwards. Now, I come from an upholstery background and we just make it up as we go & then steam the heck out it at the end :) haha
Here is the final product! I also have an industrial sewing machine that really doesn't do too well on light weight fabrics and it's nearly impossible to sew along the very edge of something because the machine will "eat" the edge. But this is for my own personal use & not to give or sell and I am pleased with how it turned out. My fancy phone peaking out. Perfect fit.

Wednesday, January 13, 2010

Holly Jolly Towel


This is a sweet towel that I embroidered for my sister-in-law's aunt. She wanted three towels with simple holly patterns and this is what I came up with.

Thursday, January 7, 2010

In the Works

This is a sneak peak of something that I am working on for my friend Goldy who sings. It's a part of her Christmas presents that I am sending down to her. She is so busy I am sure she doesn't read this blog so she will still be surprised when she gets it.
I cut a part of it smaller than I wanted to so I will have to see how I can "save" it and then I will show you what it's become.